Introduction to Classes
In the previous two lessons, to use a variable, we were declaring it using either var or a known and simple data type. For example, we could use an integer to declare a variable that represented the number of bedrooms of a house. Here is an example:
using System;

class Program
{
    static void Main()
    {
        int bedrooms = 3;
    }
}
As opposed to a simple variable, in C#, you can use one or more variables to create a more complete or complex object. Instead of only one file, you can create a program with many of them. Each file can contain different instructions that, when put together, can create an application as complete as possible. To create a code file, on the main menu, you can click Project -> Add New Item… In the Templates list, click Code File, accept or change the name of the file. You can omit the .cs extension. If you do, a file with the extension .cs would be added. |
A class is a technique of using one or a group of variables to be used as a foundation for a more detailed variable. To create a class, you start with the class keyword followed by a name and its body delimited by curly brackets. Here is an example of a class called House: class House
{
}
A class is created in a code file. As such, you can include it in the first file of your project. Here is an example:
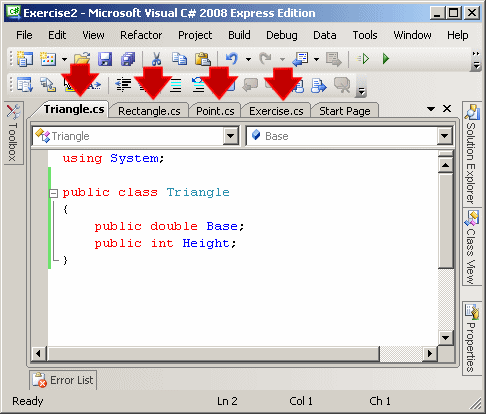
You can also create a class in its own file. To assist you with this, Microsoft Visual C# provides a wizard. To use it, on the main menu, you can click Project -> Add Class… or Project -> Add New Item… In the Templates list, click Class. In the Name text box, accept or change the default name and click Add. A new file named after the class with the .cs extension would be added to your project. When a project is made of various files, each file is represented by a tab in the top section of the Code Editor:
To access a file, you can click its tab.
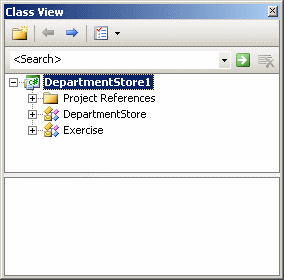
To assist you with managing the various classes of a project, Microsoft Visual C# includes various tools and windows. One of the windows you can use is called the Class View. To display it, on the main menu, you can click View -> Class View:
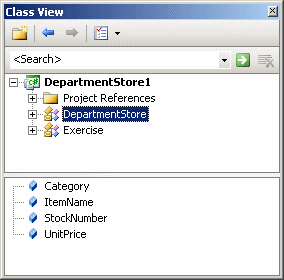
The Class View is made of four sections. The toolbar under the title bar includes four buttons. To identify a button, you can position the mouse on it and a tool tip would appear. Under the toolbar, another bar made of a combo box and a button allow you to search. The main top section of the Class View is made of various nodes. To expand a node, you can click its + button. To collapse a node, you can click its – button. The top node displays the name of the project. Under the project node, the names of classes display. The bottom section of the Class View is used to display the members of a class. To see the members of a class, you can click it in the top window. Here is an example:
To add a new class, besides the main menu, you can right-click the name of the project in the Class View, position the mouse on Add, and click Class… Like any normal variable, to use a class in your program, you can first declare a variable for it. Like the variables we introduced in the previous lesson, to declare a variable of a class, you can use the var keyword. Alternatively, you can type its name followed by a name for the variable. For example, to declare a variable of the above House class, you could type the following: using System;
class House
{
}
class Program
{
static void Main()
{
var property . . .
}
}
Or the following: using System;
class House
{
}
class Program
{
static void Main()
{
House property;
}
}
The variables we have declared so far are called value variables. This is because such variables of primitive types hold their value. The C# language supports another type of variable. This time, when you declare the variable, its name does not hold the value of the variable; it holds a reference to the address where the actual variable is stored in memory. This reference type is the kind used to declare a variable for a class. To use a variable as reference, you must initialize it using an operator called new. Here is an example: using System;
class House
{
}
class Program
{
static void Main()
{
var Property = new House();
}
}
If you are using the name of the class instead of var to declare the variable, you can first declare it. Then, on another line, you can allocate memory for it using the new operator. Here is an example: using System;
class House
{
}
class Program
{
static void Main()
{
House Property;
// You can do something here
Property = new House();
}
}
In C#, as well as Visual Basic, if you create a class in any of the files that belong to the same project, the class is made available to all other files of the same project. Unlike its sisters the C and the C++ languages, C# was developed with the idea of working complementarily with other languages such as C++/CLI, Visual Basic, and J#. In other words, code from these other languages should be able to “read” or access code written in a C# application. To make this possible, a C# class can be created as a public object. If you want your class to be accessible to code written in other languages, precede the class keyword with public when creating it. Here is an example: using System;
public class Exercise
{
static void Main()
{
var Number = 244;
var Thing = "Vehicle";
Console.WriteLine(Number);
Console.WriteLine(Thing);
}
}
When you initialize a variable using the new operator, you are in fact reserving some space in the heap memory. The memory is “allocated” for the variable. When that variable is no longer needed, such as when your program closes, it (the variable) must be removed from memory and the space it was using can be made available to other variables or other programs. This is referred to as garbage collection. In the past, namely in C/C++, this was a concern for programmers because they usually had to remember to manually delete such a variable (a pointer) and free its memory. The .NET Framework solves the problem of garbage collection by “cleaning” the memory after you. This is done automatically when necessary so that the programmer doesn’t need to worry about this issue.
Consider a class named House: public class House
{
}
The section between the curly brackets, { and }, of a class is referred to as its body. In the body of a class, you can create a list of the parts that make up the class. Each of these parts must be a complete variable with a name and a data type. For example, here are the characteristics that make up a house, declared as the parts of the above Book class and each declared as a variable: public class House
{
string PropertyNumber;
char PropertyType;
byte Stories;
uint bedrooms;
decimal Value;
}
The variables declared in the body of a class are referred to as its member variables and each member variable is referred to as a field. The fields can be any type we have seen in the previous lesson. When creating a class, it is your job to decide what your object is made of. Imagine you want to write a (console-based) program for a department store and the customer has given you a preliminary catalog as follows:
Each item in this catalog is represented by its Stock number, its name or description, and its price. Based on this, you can create a class that represents each item.
The parts of an object fall into two main categories: those you can touch and those you don’t have access to. For example, for a car parked at the mall, you can see or touch its doors and its tires but you don’t see its engine or its spare tire, you don’t even know if it has one. The parts of an object that you have access to are referred to as public. Those you can’t see or touch are referred to as private. A C# class also recognizes that some parts of a class can be made available to other classes and some other parts can be hidden from other classes. A part that must be hidden from other classes is private and it can be declared starting with the private keyword. If you declare a member variable and want to make it available to other classes, you must start its name with the public keyword. The public and private keywords are referred to as access level. By default, if you declare a member variable (or anything else) in a class but don’t specify its access level, the member is considered private and cannot be accessed from outside, that is by a non-member, of that class. Therefore, to make a member accessible by other classes, you must declare it as public. You can use a mix of public and private members in a class and there is no rule on which access level should be listed first or last. Here are examples: public class House
{
string PropertyNumber;
public char PropertyType;
byte Stories;
public uint bedrooms;
private decimal Value;
}
Just keep in mind that if you omit or forget the access level of a member of a class, the member is automatically made private. To reduce confusion as to what member is public or private, you should always specify the access level of a member variable. public class House
{
public string PropertyNumber;
public char PropertyType;
public byte Stories;
public uint Bedrooms;
public decimal Value;
}
After creating a member of a class, to access it from another class, first declare a variable from its class as we saw earlier. To actually access the member, use the period operator “.”. We have seen that the public keyword is used to let objects of the same program and objects of other programs access the public member. The private keyword is used to let only members of a class access the (private) member of the class. If you want to create a member of a class so that only objects of the same program can access that member, you can mark it with the internal keyword. The differences between these keywords can be resumed as follows:
After declaring an instance of a class, you can access each of its members and assign it the desired value. Here is an example:
public class Exercise
{
    static void Main()
    {
        var Property = new House();

        Property.PropertyNumber = 283795;
        Property.PropertyType = "Single Family";
        Property.Bedrooms = 4;
        Property.Value = 652880;
    }
}
Once a member variable has been initialized, you can use the period operator to access it and retrieve its value: using System;
public class House
{
internal long PropertyNumber;
internal string PropertyType;
internal uint Bedrooms;
internal double Value;
}
public class Exercise
{
static void Main()
{
var Property = new House();
Property.PropertyNumber = 283795;
Property.PropertyType = "Single Family";
Property.Bedrooms = 4;
Property.Value = 652880;
Console.WriteLine("=//= Altair Realty =//=");
Console.WriteLine("Properties Inventory"); ;
Console.Write("Property #: ");
Console.WriteLine(Property.PropertyNumber);
Console.Write("Property Type: ");
Console.WriteLine(Property.PropertyType);
Console.Write("Bedrooms: ");
Console.WriteLine(Property.Bedrooms);
Console.Write("Market Value: ");
Console.WriteLine(Property.Value);
}
}
This would produce: =//= Altair Realty =//= Properties Inventory Property #: 283795 Property Type: Single Family Bedrooms: 4 Market Value: 652880 Press any key to continue . . .
We saw that, to use a class, you could first declare a variable for it and initialize it. Fortunately, you don’t have to use a class to initialize an object. You can declare a variable that resembles an instance of a class and initialize it as you see fit. This is referred to as an anonymous type. To use it, declare the variable using the var keyword and use the new operator to allocate memory for it. Instead of using the name of a class, type an opening and a closing curly brackets after the new operator. In the curly brackets, state a name for each member as if it were the member of the class and initialize each member variable with the desired value. After the closing curly bracket, end the declaration with a semi-colon. Here is an example: using System;
public class Exercise
{
static void Main()
{
var BookInformation = new
{
Title = "Calculus 6e Edition",
Pages = 1074,
Cover = "Hard Back"
};
}
}
After initializing the anonymous type, you can access each one of its members using the name of the variable followed by the period operator, and followed by the member variable. Here is an example: using System;
public class Exercise
{
static void Main()
{
var BookInformation = new
{
Title = "Calculus 6e Edition",
Pages = 1074,
Cover = "Hard Back"
};
Console.WriteLine("=//= BookInformation =//=");
Console.Write("Title: ");
Console.WriteLine(BookInformation.Title);
Console.Write("Nbr of Pages: ");
Console.WriteLine(BookInformation.Pages);
Console.Write("Type of Cover: ");
Console.WriteLine(BookInformation.Cover);
}
}
This would produce: =//= BookInformation =//= Title: Calculus 6e Edition Nbr of Pages: 1074 Type of Cover: Hard Back Press any key to continue . . . Remember that spreading the declaration on many lines only makes it easy to read. Otherwise, you can as well include everything on the same line. using System;
public class Exercise
{
static void Main()
{
var Book = new { Title = "Calculus 6e Edition", Pages = 1074 };
Console.WriteLine("=//= BookInformation =//=");
Console.Write("Title: ");
Console.WriteLine(BookInformation.Title);
Console.Write("Nbr of Pages: ");
Console.WriteLine(BookInformation.Pages);
}
}
|
|||||||||||||||||||||||||||||||||||||||||||||||||||||||||||||||||||||||||||
|
Introduction |
When you create a class, the fields are meant to describe it. For a class named House, such aspects as the number of bedrooms, the property type, or its value, are used to describe it:
public class House
{
    public char PropertyType;
    public uint Bedrooms;
}
Besides the characteristics used to describe it, an object can also perform actions or assignments. An action performed by a class is called a method. A method is simply a section of code that takes care of a particular detail for the functionality of the class. To create a method, you specify its name, which follows the rules we defined for variables. The name of a method is followed by parentheses.
A method’s job is to carry a specific assignment within a program. As such, it could provide a value once the assignment has been carried. In some cases, a method must produce a result. If it doesn’t, then it is considered void. The type of value that a method can provide (or return) is written on the left side of the method name. If the method doesn’t produce a result, type void to its left. The assignment that a method carries is included between an opening curly bracket “{” and a closing curly bracket “}”. Here is an example:
public class House
{
    public char PropertyType;
    public uint Bedrooms;

    void Display()
    {
    }
}
The most regularly used method of a C# program is called Main.
Like a member variable:
- If the method will be accessed only by members of the same class, you can mark it as private or not mark it with an access keyword
- If the method will be accessed by members of the class and other parts of the same program but not outside of the program, mark it with the internal keyword
- In the method can be accessed by the members of the same class, other parts of the same program, and other parts of other programs, mark it as public
After creating a method, in its body delimited by its curly brackets, you can define the desired behavior. For example, you can write the member variables in the parentheses of Console.Write() or Console.WriteLine(). Here are examples:
public class House
{
    public char PropertyType;
    public uint Bedrooms;

    internal void Display()
    {
        Console.WriteLine("=//= Altair Realty =//=");
        Console.WriteLine("Properties Inventory"); ;
        Console.Write("Property Type:  ");
        Console.WriteLine(PropertyType);
        Console.Write("Bedrooms:       ");
        Console.WriteLine(Bedrooms);
    }
}
In the same way, you can create as many methods as you want in a class. To assist you with managing the methods of a class, the Code Editor is equipped with two combo boxes.
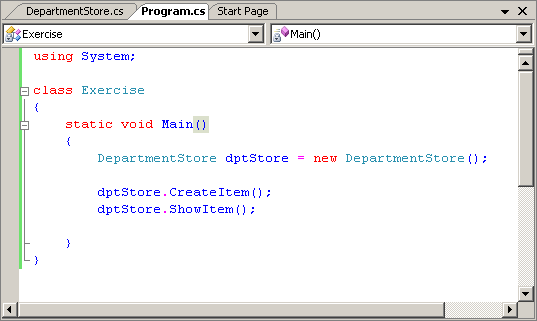
The left combo box, called Types, displays the classes that are part of the project. The right combo box, named Members, displays the members of the class that is selected in the Types combo box:
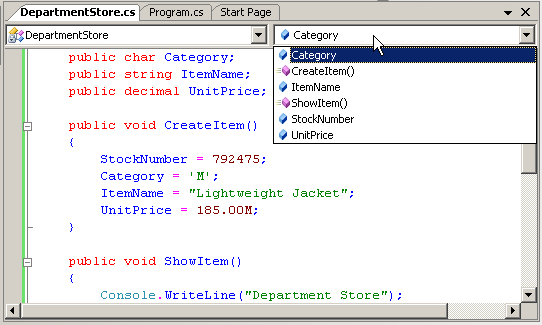
If you select an item from the Members combo box, the caret would be displayed on its declaration in the file.
The Solution Explorer is a window that displays the file names and other items used in your project. The items of this window display in a tree. To expand a node, you can click its + button. To collapse it, click its – button. To explore an item, you can double-click it. The result depends on the item you double-clicked.
The Solution Explorer can be used to create and add a new class or a new item to the current project. It can also be used to add a another project to the current project. To perform any of these operations, you can right-click a folder node such as the name of the project and position the mouse on Add to select the desired operation:
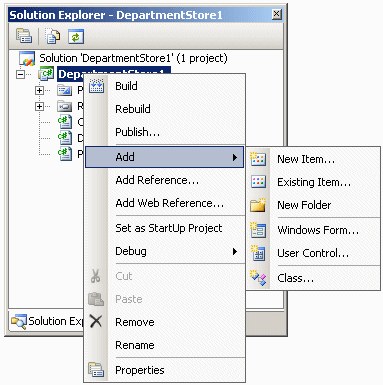
Remember that you can also perform any of these operations from the Project category of the main menu.
Besides adding new items to the project, you can also use the Solution Explorer to build the project or change its properties. If you add one or more other project(s) to the current one, one of the project must be set as the default. That project would be the first to come up when the user executes the application. By default, the first project created is set as the default. If you have more than one project, to set the default, right-click the name of the desired project in Solution Explorer and click Set As StartUp Project.
The Solution Explorer also allows you to rename or delete some of the items that belong to your project.
- Access the DepartmentStore.cs file
- To add some methods to the DepartmentStore class, change it as follows:
using System; using System.Collections.Generic; using System.Linq; using System.Text; namespace DepartmentStore1 { class DepartmentStore { public long StockNumber; public char Category; public string ItemName; public double UnitPrice; public void CreateItem() { StockNumber = 792475; Category = 'M'; ItemName = "Lightweight Jacket"; UnitPrice = 185.00D; } public void ShowItem() { Console.WriteLine("Department Store"); Console.Write("Stock #: "); Console.WriteLine(StockNumber); Console.Write("Category: "); Console.WriteLine(Category); Console.Write("Name: "); Console.WriteLine(ItemName); Console.Write("Unit Price: "); Console.WriteLine(UnitPrice); Console.WriteLine(); } } } - Access the Program.cs file and change Main() as follows:
using System; using System.Collections.Generic; using System.Linq; using System.Text; namespace DepartmentStore1 { class Program { static void Main(string[] args) { DepartmentStore dptStore = new DepartmentStore(); dptStore.CreateItem(); dptStore.ShowItem(); } } } - Execute the application. This would produce:
Department Store
Stock #:    792475
Category:   M
Name:       Lightweight R4 Jacket
Unit Price: $185.00

Press any key to continue . . .
- Close the DOS window
After creating a method, you can access it outside of its class. You do this following the same rules used to access a field, using the period operator. Unlike a field, the name of a class must be followed by parentheses. Here is an example:
using System;

public class House
{
    public char PropertyType;
    public uint Bedrooms;

    internal void Display()
    {
        Console.WriteLine("=//= Altair Realty =//=");
        Console.WriteLine("Properties Inventory"); ;
        Console.Write("Property Type:  ");
        Console.WriteLine(PropertyType);
        Console.Write("Bedrooms:       ");
        Console.WriteLine(Bedrooms);
    }
}

public class Program
{
    static void Main()
    {
        var Property= new House();

        Property.PropertyType = 'S';
        Property.Bedrooms = 4;

        Property.Display();
    }
}
This would produce:
=//= Altair Realty =//=
Properties Inventory
Property Type:  S
Bedrooms:       4
Press any key to continue . . .
|
Static Fields |
Imagine you create a class called Book. To access it in the Main() method, you can declare its variable, as we have done so far. A variable you have declared of a class is also called an instance of the class. In the same way, you can declare various instances of the same class as necessary:
using System;

public class Book
{
    public string Title;
    public string Author;
    public short  YearPublished;
    public int    NumberOfPages;
    public char   CoverType;
}

public class Exercise
{
    static void Main()
    {
	var written = new Book();
	var bought  = new Book();
    }
}
Each one of these instances gives you access to the members of the class but each instance holds the particular values of the members of its instance. Consider the results of the following program:
using System;

public class Book
{
    public string Title;
    public string Author;
    public short YearPublished;
    public int NumberOfPages;
    public char CoverType;
}

public class Exercise
{
    static void Main()
    {
        var First = new Book();

        First.Title = "Psychology and Human Evolution";
        First.Author = "Jeannot Lamm";
        First.YearPublished = 1996;
        First.NumberOfPages = 872;
        First.CoverType = 'H';

        Console.WriteLine("Book Characteristics");
        Console.Write("Title:  ");
        Console.WriteLine(First.Title);
        Console.Write("Author: ");
        Console.WriteLine(First.Author);
        Console.Write("Year:   ");
        Console.WriteLine(First.YearPublished);
        Console.Write("Pages:  ");
        Console.WriteLine(First.NumberOfPages);
        Console.Write("Cover:  ");
        Console.WriteLine(First.CoverType);

        var Second = new Book();

        Second.Title = "C# First Step";
        Second.Author = "Alexandra Nyango";
        Second.YearPublished = 2004;
        Second.NumberOfPages = 604;
        Second.CoverType = 'P';

        Console.WriteLine("Book Characteristics");
        Console.Write("Title:  ");
        Console.WriteLine(Second.Title);
        Console.Write("Author: ");
        Console.WriteLine(Second.Author);
        Console.Write("Year:   ");
        Console.WriteLine(Second.YearPublished);
        Console.Write("Pages:  ");
        Console.WriteLine(Second.NumberOfPages);
        Console.Write("Cover:  ");
        Console.WriteLine(Second.CoverType);
        Console.WriteLine();
    }
}
This would produce:
Book Characteristics
Title:  Psychology and Human Evolution
Author: Jeannot Lamm
Year:   1996
Pages:  872
Cover:  H

Book Characteristics
Title:  C# First Step
Author: Alexandra Nyango
Year:   2004
Pages:  604
Cover:  P
All of the member variables and methods of classes we have used so far are referred to as instance members because, in order to access them, you must have an instance of a class declared in another class in which you want to access them.
In your application, you can declare a class member and refer to it regardless of which instance of an object you are using. Such a member variable is called static. To declare a member variable of a class as static, type the static keyword on its left. Whenever you have a static member, in order to refer to it, you must “qualify” it in the class in which you want to call it. Qualifying a member means you must specify its class. Here is an example:
using System;

public class Book
{
    public static string Title;
    public static string Author;
    public short YearPublished;
    public int Pages;
    public char CoverType;
}

public class Exercise
{
    static void Main()
    {
        var First = new Book();

        Book.Title = "Psychology and Human Evolution";
        Book.Author = "Jeannot Lamm";
        First.YearPublished = 1996;
        First.Pages = 872;
        First.CoverType = 'H';

        Console.WriteLine("Book Characteristics");
        Console.Write("Title:  ");
        Console.WriteLine(Book.Title);
        Console.Write("Author: ");
        Console.WriteLine(Book.Author);
        Console.Write("Year:   ");
        Console.WriteLine(First.YearPublished);
        Console.Write("Pages:  ");
        Console.WriteLine(First.Pages);
        Console.Write("Cover:  ");
        Console.WriteLine(First.CoverType);

        var Second = new Book();

        Book.Title = "C# First Step";
        Book.Author = "Alexandra Nyango";
        Second.YearPublished = 2004;
        Second.Pages = 604;
        Second.CoverType = 'P';

        Console.WriteLine("Book Characteristics");
        Console.Write("Title:  ");
        Console.WriteLine(Book.Title);
        Console.Write("Author: ");
        Console.WriteLine(Book.Author);
        Console.Write("Year:   ");
        Console.WriteLine(Second.YearPublished);
        Console.Write("Pages:  ");
        Console.WriteLine(Second.Pages);
        Console.Write("Cover:  ");
        Console.WriteLine(Second.CoverType);

        Console.WriteLine();
    }
}
Notice that when a member variable has been declared as static, you don’t need an instance of the class to access that member variable outside of the class. Based on this, if you declare all members of a class as static, you don’t need to declare a variable of their class in order to access them. In the following example, the Title and Author fields of the Book class are accessed from the Exercise class without using an instance of the Book class:
using System;

public class Book
{
    public static string Title;
    public static string Author;
}

public class Exercise
{
    static void Main()
    {
        Book.Title = "Psychology and Human Evolution";
        Book.Author = "Jeannot Lamm";

        Console.WriteLine("Book Characteristics");
        Console.WriteLine("Title:  ");
	Console.WriteLine(Book.Title);
        Console.WriteLine("Author: ");
	Console.WriteLine(Book.Author);

        Book.Title = "C# First Step";
        Book.Author = "Alexandra Miles";

        Console.WriteLine("Book Characteristics");
        Console.WriteLine("Title:  ");
	Console.WriteLine(Book.Title);
        Console.WriteLine("Author: ");
	Console.WriteLine(Book.Author);

        Console.ReadLine();
    }
}
You can also declare member variables of the main class as static. If you are referring to a static member variable in the same class in which it was declared, you don’t have to qualify it. Here is an example:
using System;

public class Exercise
{
    static double Length;
    static double Width;

    static void Main()
    {
	Console.WriteLine("Rectangles Characteristics");

	Length = 22.55;
	Width = 20.25;

	Console.WriteLine("\nRectangle 1");
	Console.Write("Length: ");
	Console.WriteLine(Length);
	Console.Write("Width:  ");
	Console.WriteLine(Width);

	Length = 254.04;
	Width = 408.62;

	Console.WriteLine("\nRectangle 2");
	Console.Write("Length: ");
	Console.WriteLine(Length);
	Console.Write("Width:  ");
	Console.WriteLine(Width);

	Console.WriteLine();
    }
}
|
Static Methods |
Like a member variable, a method of a class can be defined as static. Consequently, this particular method can access any member of the class regardless of the instance if there are many instances of the class declared.
To define a method as static, type the static keyword to its left. Here is an example:
using System;

public class Book
{
    private static string Title;
    static private string Author;
    private static int    Pages;
    static private double Price;

    static public void CreateBook()
    {
	Title  = "Psychology and Human Evolution";
	Author = "Jeannot Lamm";
	Pages  = 472;
	Price  = 24.95;
    }

    static public void ShowBook()
    {
	Console.WriteLine("Book Characteristics");
	Console.Write("Title:  ");
	Console.WriteLine(Book.Title);
	Console.Write("Author: ");
	Console.WriteLine(Book.Author);
	Console.Write("Pages:  ");
	Console.WriteLine(Pages);
	Console.Write("Price:  ");
	Console.WriteLine(Price);
    }
}

public class Exercise
{
    static void Main()
    {
	Book.CreateBook();
	Book.ShowBook();
    }
}
This would produce:
Book Characteristics
Title:  Psychology and Human Evolution
Author: Jeannot Lamm
Pages:  472
Price:  24.95
The ReadLine(), the Write(), and the WriteLine() methods of the Console class that we have used so far are examples of static methods.
A static class:
- Is a class whose members must be accessed without an instance of the class. In other words, the members of a static class must be accessed directly from (using the name of) the class, using the period operator
- Is a class whose members must be created as static. In other words, you cannot add a non-static member to a static class: all members, except for constants, must be static
To create a static class, precede the class keyword with the static keyword. Based on the above two rules, here is an example:
using System;

namespace Staticity
{
    public static class Square
    {
        public static double Side;

        public static double Perimeter()
        {
            return Side * 4;
        }

        public static double Area()
        {
            return Side * Side;
        }
    }

    public class Exercise
    {
        static void Main()
        {
            Square.Side = 36.84;

            Console.WriteLine("Square Characteristics");
            Console.Write("Side:      ");
	    Console.WriteLine(Square.Side);
            Console.Write("Perimeter: ");
	    Console.WriteLine(Square.Perimeter());
            Console.Write("Area:      ");
	    Console.WriteLine(Square.Area());
        }
    }
}
This would produce:
Square Characteristics
Side:      36.84
Perimeter: 147.36
Area:      1357.1856
Press any key to continue . . .
|
Characteristics of Members of a Class |
Unlike C/C++, in C#, you can create a constant variable in a class. As done in Lesson 2 when studying variables, to declare a constant variable, type the const keyword to the left of the variable. Once again, when declaring a constant, you must initialize it with an appropriate constant value.
If a class contains fields and methods, the (non-static) field members are automatically available to the method(s) of the class, even fields that are private. When accessing a field or a method from another method of the class, to indicate that the member you are accessing belongs to the same class, you can precede it with the this member and the period operator. Here are examples:
public class House
{
    internal char PropertyType;
    internal uint Bedrooms;

    internal void Display()
    {
        Console.WriteLine("=//= Altair Realty =//=");
        Console.WriteLine("Properties Inventory"); ;
        Console.Write("Property Type:  ");
        Console.WriteLine(this.PropertyType);
        Console.Write("Bedrooms:       ");
        Console.WriteLine(this.Bedrooms);
    }
}
When using the this member variable (in C/C++, it is a pointer), you can access any member of a class within any method of the same class. There are rules you must observe when using this:
- The this member can never be declared: it is automatically implied when you create a class
- this cannot be used in a class A to access a member of class B. The following will cause an error:
public class Exercise { static void Main() { House property = new House(); property.PropertyType = 'S'; property.Bedrooms = 4; this.property.Display(); } } - this cannot be used in a static method
- Access the DepartmentStore.cs file and, to use this, change the class as follows:
using System; using System.Collections.Generic; using System.Linq; using System.Text; namespace DepartmentStore1 { class DepartmentStore { public long StockNumber; public char Category; public string ItemName; public double UnitPrice; public void CreateItem() { this.StockNumber = 792475; this.Category = 'M'; this.ItemName = "Lightweight Jacket"; this.UnitPrice = 185.00D; } public void ShowItem() { Console.WriteLine("Department Store"); Console.Write("Stock #: "); Console.WriteLine(this.StockNumber); Console.Write("Category: "); Console.WriteLine(this.Category); Console.Write("Name: "); Console.WriteLine(this.ItemName); Console.Write("Unit Price: "); Console.WriteLine(this.UnitPrice); Console.WriteLine(); } } } - Execute the application to see the result
- Close the DOS window
10,926 total views, 1 views today

